57

I had to print a couple of PDFs recently to send to someone, but I wanted to redact (black out) a couple small bits of text.

A quick google search didn't turn up any tools for this specific purpose, so I fell back to imagemagick & gimp:

  • convert document.pdf document.png
  • gimp document-0.png
  • (use paintbrush to black out text)
  • print redacted page from gimp
  • print remaining pages from xpdf

The problem with this strategy is that the conversion process (from PDF to PNG or whatever other format) loses quality. I tried editing the PDF in gimp but it didn't work right away.

Is there a specific tool that permits redaction in this way? (It doesn't even need to be "real" redaction -- I'm not sending a softcopy so "fake" redaction will work because the hardcopy can't be hacked to reveal the underlying text.)

Or, is there a trick to being able to edit PDFs in gimp?

bstpierre
  • 2,284

20 Answers20

42

You can use Okular.

sudo apt-get install okular
  1. Open the pdf with Okular.
  2. Press F6 (or go to Tools --> Annotations).
  3. Press 8.
  4. Highlight the text you wish to redact.
  5. Right click the text, select properties, select the "Type" as "Highlight", press Ok.
  6. Print the file to a pdf (check "Force rasterization" to make sure the redacted text is removed from the resulting file).
Gabriel Staples
  • 11,502
  • 14
  • 97
  • 142
eharvey
  • 437
22

(originally I recommened Okular but it didn't work as I expected)

1. Edit the document in a vector editor

I was able to open a PDF file in Inkscape, draw a rectangle over a piece of text and print it out. Inkscape is a vector editor so no rasterization involved. Some fonts looked wrong though - probably because the document was created on Windows machine with fonts which are absent on mine.

Note that any method that does not involve rasterization is only acceptable if you're going to print the redacted document on paper and not distribute it electronically, as the text still can be retrieved from under blackouts.

2. Increase the rasterization resolution when opening in a bitmap editor

Regarding "quality loss" when opening the page in Gimp: you can directly open a PDF file in Gimp. It will be rasterized in the process. The amount of quality loss in the process is a matter of resolution you choose when importing - 300 dpi should give you a very decent quality (the default is 100).

You can also get good results with ImageMagick's convert command if you tell it to increase resolution:

convert -density 300x300 ...
Sergey
  • 44,353
16

Basically what you are trying to do is highlight/annotate a PDF, but with some flexibility towards marker opacity and colour (you mentioned you don't need to censor/remove something, merely redact). Have you taken a look at answers here: How can I highlight or annotate PDFs?

One of the highest rated answers recommends Xournal, which has not been mentioned here and would be my weapon of choice. It is a tool that allows you to make handwritten notes but has extra features allowing you to annotate a PDF. By default it'll save your annotations as a separate file but also allows you to export the annotated PDF as a new PDF. This should maintain the layout, fonts, etc.

With Xournal you'd choose "Annotate PDF", then use a solid black marker to mask the parts you want to redact, and "Export to PDF".

There are some stories on the internet suggesting that Xournal rasterises the text in the exported PDF (thanks for pointing this out, MHC). This does not seem to be true: with simple annotations, the text remains selectable and searchable and the file size does not increase by much (it increased from 205 kb to 220 kb in the example below).

To install, run in a terminal: sudo apt-get install xournal or just select it from the Software Centre

Xournal interface Resulting exported PDF

Tomas
  • 1,099
5

I am redact a lot of PDF files everyday, so I spend a lot of time thinking how to do it the best way.

For me the best way is split PDF in 1-page PDF file, next to edit with GIMP, next to combine it. I don't use imagemagick on all files (I do not use at all), so I don't loss text-layer on all pages, but only on redacted. Do not load the whole PDF file at once, because it causes memory exhaustion.

Split PDF in 1-page files

Easily split PDF files to 1-page PDF you can by this bash function (put it in ~/.bashrc):

function pdf_split(){
    for file in "$@"; do
        if [ "${file##*.}" != "pdf" ]; then
            echo "Skip $file because it's not PDF file";
            continue
        fi; 
        pages=$(pdfinfo "$file" | grep "Pages" | awk '{print $2}') 
        echo "Detect $pages in $file";
        filename="${file%.*}";
        unset Outfile;
        for i in $(seq 1 "$pages"); do
            pdftk "$file" cat "$i" output "$filename-$i.pdf";
            Outfile[$i]="$filename-$i.pdf";
        done;
    done;
};

You can now enter split_pdf file.pdf to get a lot of PDF files.

Redact files

But, now you need edit all this files. 
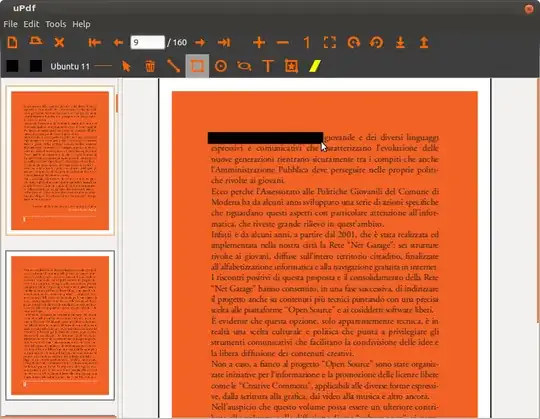
You can do it with gimp original-filename-*.pdf. I suggest configure shortcut in GIMP (Main window->Edit-> Shortcut) to replace file (I use CTRL+R), blur filter (eg. CTRL+D), close file (eg. CTRL+W) and exit GIMP (eg.CTRL+Q). Remember to don't load in GIMP to many files at once, but GIMP as you about load after open, so you can use gimp original-filename-*.pdf on thousand files safe.

Combine files

You can combine files easily with: pdftk originam-filename-*.pdf cat output "new-file-anon.pdf";

Connect it all together

These operations are very repetitive and boring, so I connect it all in 1 script:

function pdf_redact(){
    for file in "$@"; do
        if [ "${file##*.}" != "pdf" ]; then
            echo "Skip $file because it's not PDF file";
            continue
        fi; 
        pages=$(pdfinfo "$file" | grep "Pages" | awk '{print $2}') 
        echo "Detect $pages in $file";
        filename="${file%.*}";
        unset Outfile;
        for i in $(seq 1 "$pages"); do
            pdftk "$file" cat "$i" output "$filename-$i.pdf";
            Outfile[$i]="$filename-$i.pdf";
        done;
        gimp "${Outfile[@]}";
        pdftk "${Outfile[@]}" cat output "$filename-anon.pdf";
        rm "${Outfile[@]}";

    read -p "Do you want open output file? " -n 1 -r
    echo    
    if [[ $REPLY =~ ^[Yy]$ ]]
    then
            evince "$filename-anon.pdf";
    fi

    read -p "Do you want upload output file to Scribd.com? " -n 1 -r
    echo 
    if [[ $REPLY =~ ^[Yy]$ ]]
    then
        scribd_up "$filename-anon.pdf";
    fi
    done;
};

The newest version of this script is always accessible at: http://dostep.jawne.info.pl/it/bashrc

Remember to close GIMP (CTRL+Q) after all redaction to continue script.

In addiction it as me to open redacted files (I like read to check whether all) and as to upload to Scribd with my other script - scribd_up, so now I can redact a lot of PDF files very efficiently.

4

As a lot of solutions here recommend redacting / blacking out through annotations (which leave the original content in the pdf), I recommend rasterizing the pdf afterwards to truly remove the original content. (Don't be this guy.)

Here's one way to do that which, at the same time, keeps the quality up and the file size low (at least in my case of a bunch of black/white pages):

$  convert -quality 100 -density 180 -compress zip notreallyredacted.pdf trulyredacted.pdf

Note: convert needs ImageMagick.

Note 2: convert does not preserve the contents of forms you might have filled out. In order for it to not get lost you might want to print the document "to a file" in something like evince first (or in whatever application you filled out the form) and then rasterize it.

UPDATE November 2023: I noticed that this approach works well when annotating the PDF with e.g. Foxit PDF Reader but not with Evince. In the latter case, the annotations won't show up in the rasterized version, i.e. everything will be visible again. This is quite weird because whether I annotate the PDF with black rectangles/text highlights using Foxit or Evince, the resulting annotating PDF superficially looks the same in the other PDF reader (Evince or Foxit) respectively. But ImageMagick seems to see different things.

balu
  • 247
3

Xournalpp is a popular variant of Xournal which has what you need. It is not available via the package manager (on Ubuntu 20.10), but a Github release can be built using CMake.

The build instructions here suggest the following dependencies:

sudo apt-get install cmake libgtk-3-dev libpoppler-glib-dev portaudio19-dev libsndfile-dev libcppunit-dev dvipng texlive libxml2-dev liblua5.3-dev libzip-dev librsvg2-dev gettext lua-lgi

In Xournalpp you should then select the rectangle icon and, next to the pen colours, the paint bucket icon. You can then create filled rectangles - but they will be transparent. To make them fully opaque, select Tools > Pen Options > Fill Transparency and change the pop-up to 100%. (This is explained on the Github issue here.)

3

Redacting a PDF: draw black boxes over sensitive text or images using LibreOffice Writer or Foxit PDF Reader, then rasterize in Okular

Tested on Ubuntu 22.04.2.

(Don't be scared by the long answer. This takes just a couple minutes once you've done it a couple times. I provide a lot of detail to make you understand the process the first time is all).

Redacting PDFs is a fairly common need for me, and after much trial and pain over the years, this is the process I've finally come to:

Summary (quick description)

  1. Use Foxit Reader or LibreOffice Writer to draw black boxes over sensitive content.
  2. Use Okular to print the resulting PDF to another PDF, with "Force rasterization" on in order to force-merge your concealing black box with the images underneath, thereby truly removing, not just concealing, your sensitive content.
  3. Run my tool on your pdf (ex: pdf2searchablepdf path/to/my_sanitized_pdf.pdf to make it searchable again.

Details (full, detailed tutorial)

  1. Install Foxit Reader: https://www.foxit.com/pdf-reader/

    1. Note: this is the best PDF reader for Linux, in my opinion, for general use, as it allows you to take notes on your PDFs. You can highlight, draw, underline, strike through, take notes on, etc., PDFs.
    2. But, it's not open source. It's only no cost.
    3. Also, it is sometimes buggy. If it ever freezes for you, run pkill -f foxit to kill all open instances of Foxit Reader. This usually fixes it for me and I can then open it again. Sometimes the dropdown menus get stretched or put in weird places on your screen too. Drag it to a different monitor and it may fix it.
  2. Install Okular PDF reader:

    sudo apt update 
    sudo apt install okular
    
  3. Redact your PDF by drawing black boxes over sensitive content.

    1. Option 1 (what I normally do): use Foxit Reader:

      1. Open your PDF in Foxit Reader.

      2. (Optional) Go to View --> Page Display --> Continuous.

      3. Click the "Comment" button at the top center to bring up your highlighting and markup tools (see image below).

      4. Use the "Highlight" button at the top left to highlight sensitive searchable text. Or, use the "Area Highlight" button at the top right to draw boxes to highlight sensitive text or images. Here is an image showing some areas of a PDF I've just highlighted to redact. I've circled the 3 buttons at the top, and my Foxit Reader highlight redactions are in yellow:

        enter image description here

      5. Right-click your highlighted text and go to "Properties" --> click the colored box and choose the black color, and set the "Opacity" to 100% (important, I think) to fully hide the contents underneath it. Also check the box for "Set Current Properties as Default" so that future highlight actions will use these settings. Here are my settings:

        enter image description here

        Click "Close" to apply this change to your highlighted text.

        Right-click your other highlighted section (ex: what you highlighted with the "Area Highlight" tool) and repeat the process.

      6. You now have both the "Highlight" tool and the "Area Highlight" tool configured to apply black, 100% opaque highlighting to cover up sensitive parts of your document. Use these tools to redact your document. Save as you go.

      7. When done, save the PDF with the save button in the top-left.

      8. Do NOT stop here! You still need to rasterize the document to merge your redactions with the content underneath, thereby stripping the original text and images.

    2. Option 2 (what I do for redacting with many boxes in repeated patterns, such as on a W-2 US tax form): use LibreOffice Writer:

      1. Notes:
        1. This works well on W-2 tax forms because they have the same section duplicated 4 times.
        2. It's a bit of a pain, but this is the best way I've found for 1 or 2 pg PDFs, such as W-2s, where you need to repeatedly copy/paste groups of redaction boxes into multiple places.
        3. The benefits of doing it in LibreOffice Writer are that you can draw text boxes to redact sections, then multi-select them with Shift, group them with the right-click menu, and copy/paste more boxes in the event of redacting multiple similar sections of the document. This means you draw 20 or so boxes one time, then group them and copy/paste them 3 times (to cover all 4 sections of the W-2), rather than drawing 80 boxes (redoing the same pattern of 20 or so boxes 4 times).
      2. Follow my steps to convert a PDF to JPG images, here. Converting the PDF to an image removes all searchable text.
      3. Drag the JPG image into LibreOffice Writer. Resize it to fill the whole page.
      4. Draw filled rectangular boxes all over the text you'd like to redact.
      5. Multi-select (with Shift) and right click --> "Group" the boxes if desired. Copy/paste groups of boxes as desired, and move them with the Arrow Keys. Hold Alt for fine-tuned adjustments.
      6. Export as a PDF: File --> Export As --> Export as PDF...
      7. Do NOT stop here! Even though you just stripped all searchable text by converting the original PDF to a JPG image first, you still need to rasterize the document to merge your redactions with the content underneath, thereby stripping any redacted image content you don't want others to see.
  4. Rasterize with Okular:

    1. Open up your pseudo-redacted PDF, which has opaque black boxes drawn all over it, in the Okular PDF reader.

    2. Go to File --> Print --> choose "Print to File (PDF)" as the printer from the drop-down menu --> click "Options" at the bottom-left of the window --> choose the "PDF Options" tab --> check the box for "Force rasterization" [VERY IMPORTANT!] --> set your desired "Output file" path --> click "Print". Here are what my settings look like:

      enter image description here

      Note that rasterization is super important! Rasterization is what converts the entire PDF into an image, which 1) removes searchable text from the PDF, thereby actually redacting your text if you used the Foxit Reader option above, and 2) blends your redaction boxes in with the images and text behind them, thereby actual redacting the image content left over behind your boxes from both redaction options above.

      If you hover your mouse over the "Force rasterization" check box in Okular, you'll see a little popup context window that says:

      Rasterize into an image before printing

      Press Shift for more.

      If you press Shift, the context window gets bigger and says:

      Forces the rasterization of each page into an image before printing it. This usually gives somewhat worse results, but is useful when printing documents that appear to print incorrectly.

      Here is a screenshot of that:

      enter image description here

      The PDF you have rasterized and printed-to-PDF from Okular is now your final, redacted PDF you can share with others. But, before we do that, let's verify that is truly has been sanitized.

  5. Verify that your PDF is sanitized.

    1. To verify that boxed-over text is gone, try to copy/paste text from it:

      1. open the final PDF in a PDF viewer and press Ctrl + A to select all searchable text (there should be none), followed by Ctrl + C to copy it. Then, open a text editor and use Ctrl + V to try to paste any copied text. If you properly did rasterization above, nothing should paste into your text editor, because all searchable text is now only an image. If you skipped that step, you'd be able to copy and paste all text, even the text you covered up with black boxes.
    2. To verify that boxed-over images are gone, we are doing to extract the underlying images from the PDF. This is not The same as converting a PDF to images. For the latter, see my answer here. But for the former, which is what we want this time, see @pl1nk's answer here. Here are the steps:

      # extract images from the PDF
      mkdir -p temp
      pdfimages -all my_rasterized_pdf.pdf temp/rasterized
      

      The above command will convert all images found in the PDF to their corresponding embedded image types, and store them in files like this:

      temp/rasterized-000.jpg  # pg1 as an image
      temp/rasterized-001.jpg  # pg2 as an image
      temp/rasterized-002.jpg  # pg3 as an image
      temp/rasterized-003.jpg  # pg4 as an image
      etc.
      

      Open each image and you should see only sanitized image content, with black boxes over the images and text wherever you drew black boxes over the images and text.

      As a comparison, run pdfimages over the pre-rasterized version, like this:

      pdfimages -all my_NOT_rasterized_pdf.pdf temp/NOT_rasterized
      

      ...and you'll see files like this, of whatever type their embedded type was:

      temp/NOT_rasterized-000.png  # embedded images within the pdf
      temp/NOT_rasterized-000.tif  # embedded images within the pdf
      temp/NOT_rasterized-001.png  # embedded images within the pdf
      etc.
      

      Open those images and you will see unsanitized image content, with no black boxes anywhere! You will see the full, original images.

      So, now you've seen what rasterization does, and that just drawing black boxes is not enough. You need to convert the PDF to a new image somehow to strip all text and underlying image data.

  6. Done!

Lastly, if you want to convert your sanitized PDF back into a searchable PDF, get my tool here: pdf2searchablepdf. Then install it like this:

git clone https://github.com/ElectricRCAircraftGuy/PDF2SearchablePDF.git
PDF2SearchablePDF/install.sh
. ~/.profile
pdf2searchablepdf -h

Don't delete the repo you downloaded. The installed file is a symlink that links to it.

Use it to convert my_rasterized_pdf.pdf into a searchable PDF, like this:

pdf2searchablepdf -c my_rasterized_pdf.pdf

This will produce these 4 searchable files, which are possibly, but not always, up to 3 or 4 distinct sizes:

my_rasterized_pdf_searchable.pdf
my_rasterized_pdf_searchable_large.pdf
my_rasterized_pdf_searchable_medium.pdf
my_rasterized_pdf_searchable_small.pdf

Size tests on a real file:

Here is some real test data I just produced, so you can get a feel for how the PDF size will vary at each step:

# original 5-pg PDF file
# - generated from a LaTeX file using `pdflatex`, as I explain here:
#   https://askubuntu.com/a/1473017/327339
my_pdf.pdf                              # 139.5 kB

after using Foxit Reader to draw a few black highlight boxes onto it

my_pdf_redacted.pdf # 141.9 KB

After using Okular to rasterize the PDF via print-to-pdf with the "Force

rasterization" box checked

my_pdf_sanitized.pdf # 2.6 MB

After using my pdf2searchablepdf tool to re-OCR the document and make it

searchable again:

my_pdf_sanitized_searchable.pdf # 1.9 MB, and looks good my_pdf_sanitized_searchable_large.pdf # 1.9 MB, and looks good my_pdf_sanitized_searchable_medium.pdf # 507.8 KB, and looks okay (very usable) my_pdf_sanitized_searchable_small.pdf # 170.7 KB, and looks horrible

TODO

  1. [ ] Find a way to rasterize from the command-line instead of using Okular, so that I don't have to use such a heavy GUI tool for such a simple step that could probably be automated.
Gabriel Staples
  • 11,502
  • 14
  • 97
  • 142
3

I remember one time me and a colleague had to find a way to edit a couple of pdf, We ended up using Gimp. I will comment you the details ... we open the pdf directly with gimp (in a terminal)

gimp the_file.pdf

Once you are finished editing, we did not save the changes, instead of that we print in to pdf file ... That seemed to work ok.

Glutanimate
  • 21,763
maniat1k
  • 8,340
2

Web Tools

Okay, if your document is really sensitive, you don't want it going anywhere before redaction. Here are some web tools that may have good policy. The thing with these, is they have businesses aimed at corporate clients and offer these services to showcase their SDKs. Make sure to read their terms of service.

Never leave the browser

https://pdf.online/redact-pdf

Leave the browser but they get deleted afterwards

https://freepdfredactor.com/

https://avepdf.com/redact-pdf

Other suggestions

If you find better tools out there, feel free to comment. We'd like to have a good list of what's available to us.

Majal
  • 8,249
2

PDF Studio is a non-opensource and is software that requires purchasing.

In terms of this question, from version 8 onwards it has a manual redaction feature. Users can select a text object and redact it. The content is removed from the PDF and replaced with a black rectangle.

In version 9 coming third quarter 2013, redaction annotations and burning will be also available for images and shapes.

fossfreedom
  • 174,526
Lilou
  • 19
2

Open the PDF with the free tool PDF-Xchange PDF Viewer. Black out the text to be redacted using black rectangles. Print. That will get you easy, high-quality "fake" redaction.

MetaEd
  • 137
2

Use LibreOffice Draw for that quick editing that you are looking for. After you are done you can save it as LibreOffice Draw format or export it again to PDF format (File>Export as PDF)

enter image description here

To be able to import PDF files in to LibreOffice Draw you must first install the package libreoffice-pdfimport.

Install it via the Ubuntu Software Center (libreoffice-pdfimport Install libreoffice-pdfimport) or via a terminal with sudo apt-get install libreoffice-pdfimport.

Bruno Pereira
  • 74,715
2

If you don't want to remember the correct incantation for convert you can use pdf-redact-tools, a shell script automating the process of exploding a PDF into PNG images and merging them back together after redaction (using a tool of your choice e.g. gimp). It's conventiently apt-get installable.

kynan
  • 2,235
1

You could also try this tool: https://launchpad.net/updf

Here it is (but anyway, the text is selectable):

enter image description here

1

The best way I have found to do this is to use http://www.pdfescape.com. You can annotate, add text and images, draw a "whiteout" rectangle around stuff you want to redact, and you can quickly download and save it. It also works really well with multi-page documents, which is something that lots of other solutions don't work well with. For example, if you open a multi-page document in Gimp or Inkscape, you will only be able to open one page at a time. The process is much faster in PDFescape. The whole process for me to redact a 2-page document takes less than a minute.

1

There are multiple editors for editing PDF documents directly, such as pdfedit, or converter it to other vector formats that might be better supported, such as pstoedit. However I wouldn't recommend the use of any of them as the risk of doing something stupid, like just painting over the text with black while leaving the vectors in place is to easy, thus making the redaction trivial to undo.

Going the vector to bitmap route is the safest way, preferably the 1bit bitmap route, to avoid any potential issues with alpha channels or color differences that could leave the text readable.

If possible you should always redact the original document and just flat out remove the info, not the paint on the PDF, as even the kerning and spacing of text around the redacted text can give it away.

Grumbel
  • 4,879
0

I was very surprised that all the other answers involve jumping through various kinds of hoops (rasterisation, splitting/joining files, using special tools, ugh).

There is a simple tool called redact-magic-paste that can be used to easily and directly convert the (to be redacted) text into a sequence of solid block "█" characters. This means that the redacted text is gone - so the resulting file is safe to share digitally as well as print - while also avoiding the downsides of rasterisation (huge unsearchable files, splitting/joining, etc).

I recently used it to redact some PDFs, my workflow was:

  1. Open the PDF in LibreOffice (which opens it as a "Drawing", not great but good enough for this).
  2. Run the tool in a terminal. You need to tell it the font (and size) of the text that's going to be redacted.
  3. For each redaction, highlight the text to be redacted, then press Ctrl-C, then Ctrl-V. The tool automatically and instantly converts the copied text into a roughly equivalent length of solid block characters. So then when you paste, the original text gets replaced by this redaction block.
  4. When you're done, print or export to PDF as usual. Press Ctrl-C in the terminal to stop the tool.

Disclaimer: I wrote this thing (...because I couldn't bring myself to do the hoop-jumping).

devkev
  • 36
0

I opened my PDF with LibreOffice Draw version: 24.8.3.2 (X86_64)

You can actually do search and replace. Either replace with an empty string or boxes or dots or dashes or something, then export as a PDF. That way the original text should be completely gone, but the rest of the text is still searchable. The file I ended up with was bigger, but not huge, 1 MB for 25 pages.

Josh
  • 111
  • 4
0

I add to the list: Krita. Had no quality loss, because when importing PDF you can define dpi (set it to 300, as @Sergey said). After editing hit "Export as PDF". Lastly, I find Krita more intuitive than Gimp, after having been a long time user of Photoshop.

jmjr
  • 103
  • 6
-2

If using LibreOffice to create PDF file, open doc in LibreOffice , highlight text to be redacted, right click and select character, select Background and click on black. Export to PDF.

Dave
  • 1