GPU PASSTHROUGH TROUBLESHOOTING
The troubleshooting guide have been tested on different releases of Ubuntu. Please create a bootable Ubuntu Live USB/CD/DVD before you start system changes.
Disclaimer: This troubleshooting guide was written for research purposes. The author have no responsibility for any consequences, including potential device brick, violating manufacturer licenses, lose device warranty etc.
Problem: I installed the Nouveau driver. Instead of the login screen, I see a black screen with a mouse cursor on my primary or secondary monitor.
Solution 1. Action:
Set the BIOS to use the Discrete Graphics Card as the primary boot device
Boot the Ubuntu operating system
Edit the configuration file
$ sudo nano '/etc/gdm3/custom.conf'
Uncomment the line “# WaylandEnable=false” to force the login screen to use Xorg
Use CTRL+x to save the changes
Note: To undo the change, comment (#) the line “WaylandEnable=false”.
Solution 2. Action:
Set the BIOS to use the Discrete Graphics Card as the primary boot device
Boot the Ubuntu operating system
Create a new file named bl_nvidia.conf
$ sudo nano '/usr/lib/modprobe.d/bl_nvidia.conf'
Add following lines:
blacklist nvidia
blacklist nvidia-drm
blacklist nvidia-modeset
alias nvidia off
alias nvidia-drm off
alias nvidia-modeset off
blacklist nouveau
blacklist lbm-nouveau
alias nouveau off
alias lbm-nouveau off
Use CTRL+x to save the changes
Note: When using solution 2, Proprietary and Nouveau drivers for NVIDIA Graphics Devices will not load.
Note: To undo the change, delete the bl_nvidia.conf file.
$ sudo rm '/usr/lib/modprobe.d/bl_nvidia.conf'
Problem: Gnome login screen is not displayed after rebooting the system.
Action:
- It is possible that your system is booting with integrated graphics,
while the vaio.conf file is missing, is empty, has incorrect text or
the lines described in step 9 start with # character. Check step 9.
Problem: The emulator may not have search permissions for the path '/*.qcow2'
Action:
- Run virt-manager with sudo privileges or use chown, chgrp, chmod
commands to fix. See the STEPS from this GUIDE.
Problem: Error starting domain: Cannot access storage file '/*.qcow2' (as uid:10101, gid:101): Permission denied
Action:
- Run virt-manager with sudo privileges or use chown, chgrp, chmod
commands to fix. See the STEPS from this GUIDE.
Problem: The guest machine start normally but I see a black screen on the output of PCI-Express Graphics Device.
Action:
check the cable connections and the settings of your monitor
check the steps 1, 2, 14
install the correct device driver on Windows
uninstall and reinstall the device driver on Windows
update the device driver on Windows
Problem: When using a USB redirector, devices such as a webcam, USB audio interface, USB HDD/SSD not work correctly.
Action:
- Use an additional PCIe USB card, necessarily with IOMMU-support (PCIe
card passthrough solution).
Problem: Intermittent sound with crackling on guest machine with Windows 10 operating system.
Action:
- use generic kernel
- Make sure that the Tjunction
max value has not
been exceeded
- Disable WiFi in Ubuntu
- to improve guest machine performance, set CPU governor on Ubuntu
operating system to "Performance"
- if you are using the HDA (ICH9) or HDA (ICH6) model with built in
sound card set the number of vCPUs to half the number of CPUs of the logical host
- if you are using an additional PCIe Gen3 x4 USB 3.2 card (PCIe card passthrough solution) with an USB audio interface, set processor topology manually (sockets, cores, threads) referring to physical CPU topology
- if you are using an additional PCIe Gen3 x4 USB 3.2 card (PCIe card
passthrough solution) with an USB audio interface, try different
audio interface driver version
- if the operating system Ubuntu has been converted to Ubuntu Studio, try reverting all changes
- install clean Ubuntu operating system and try again.
Problem: The CPU governor "Performance" profile was available, but has now disappeared.
Action (Experimentally):
- Find available Generic Kernel Images and install one of them
$ sudo apt list linux-*image-* | grep generic
$ sudo apt-get install linux-image-x.x.x-01-generic
Note: The x.x.x-01-generic and x.x.x-05-generic texts are used for examples.
Reboot your system
Keep hitting Shift until you see "Grub Loading Message". Through the
"Advanced options for Ubuntu" menu, select and boot the installed
kernel (linux-image-x.x.x-01-generic)
Use VirtManager to create a new guest machine and do a fresh
installation of Ubuntu. Note that ideally the Ubuntu release and
updates must be identical to those installed on the host machine
On guest machine run nautilus as root
$ sudo nautilus
/boot/config-x.x.x-05-generic
      initrd.img-x.x.x-05-generic
      System.map-x.x.x-05-generic
      vmlinuz-x.x.x-05-generic
and directory
/lib/modules/x.x.x-05-generic
in .tar.xz format
/boot/config-x.x.x-05-generic
      initrd.img-x.x.x-05-generic
      System.map-x.x.x-05-generic
      vmlinuz-x.x.x-05-generic
and directory
/lib/modules/x.x.x-05-generic
from the physical hard drive. Then extract the .tar.xz files to the appropriate directories
- Reinstall the kernel image
$ sudo apt-get -f reinstall linux-image-x.x.x-05-generic
$ find /boot/vmli*
You should get similar text:
/boot/vmlinuz
/boot/vmlinuz-x.x.x-01-generic
/boot/vmlinuz-x.x.x-05-generic
/boot/vmlinuz.old
- Reboot your system
- Keep hitting Shift until you see "Grub Loading Message". Through the
"Advanced options for Ubuntu" menu, select and boot the reinstalled
kernel (linux-image-x.x.x-05-generic)
- Check if the correct kernel is being used
$ uname -a
You should get similar text: Linux computername x.x.x-05-generic #35-Ubuntu SMP PREEMPT_DYNAMIC Mon Jan 01 00:00:00 UTC 2024 x86_64 x86_64 x86_64 GNU/Linux
- Set CPU governor to "Performance"
$ sudo powerprofilesctl set performance
- To get the current active power profile, run the following:
$ sudo powerprofilesctl get
Note: You should get the text "Performance".
Problem: My guest machine freezes consequently my USB audio interface crashing (for passthrough solution using an additional PCIe Gen3 x4 USB 3.2 card).
Action:
Make sure the root directory has approximately 8 GB of free space
Make sure that the Tjunction
max value has not
been exceeded
Remove unused virtual hardware from your guest machine (Sound,
Network, Controllers, Channel, USB Redirection)
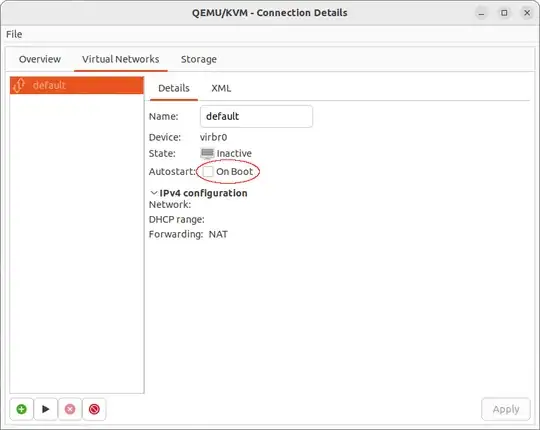
In Virtual Machine Manager go to Edit > Connection Details and
uncheck 'On Boot' via Virtual Networks tab

- Using the cpupower-gui utility, set the Min freq. value to the base
frequency of the processor. Be careful, the processor may overheat
(see CPU
Tcase)

To use cpupower-gui, install the following package:
$ sudo apt-get install cpupower-gui
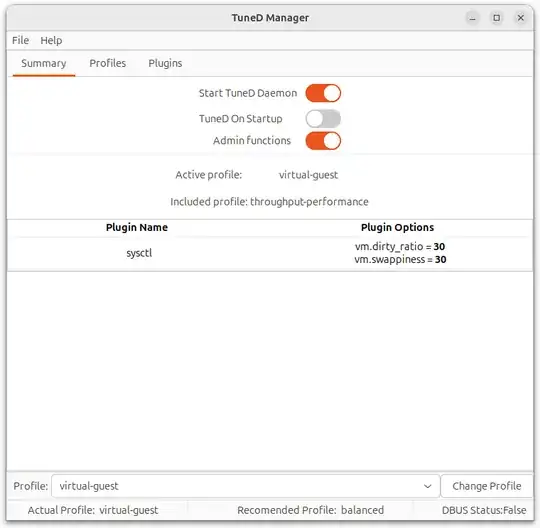
- Set a "virtual-guest" profile using tuned-gtk
To use tuned-gtk, install the following packages:
$ sudo apt-get install tuned ksmtuned tuned-gtk tuned-utils tuned-utils-systemtap
Optionally install the following, replacing x.x.x-xx with the appropriate version:
$ sudo apt-get install linux-buildinfo-x.x.x-xx-generic linux-cloud-tools-x.x.x-xx linux-cloud-tools-x.x.x-xx-generic linux-cloud-tools-common linux-doc linux-headers-x.x.x-xx linux-headers-x.x.x-xx-generic linux-lib-rust-x.x.x-xx-generic linux-libc-dev linux-modules-x.x.x-xx-generic linux-modules-extra-x.x.x-xx-generic linux-modules-ipu6-x.x.x-xx-generic linux-modules-iwlwifi-x.x.x-xx-generic linux-modules-usbio-x.x.x-xx-generic linux-source-x.x.x linux-tools-x.x.x-xx linux-tools-x.x.x-xx-generic linux-tools-common linux-tools-host
Note: I noticed that the tuned works better after installing the above packages. See Source Package linux.
You can also experimentally run the following commands
Тo launch tuned with profile "virtual-guest", run:
$ sudo powerprofilesctl set performance && sudo service tuned start && sudo systemctl enable --now tuned && sudo tuned-adm profile virtual-guest && sudo tuned -d && sudo tuned-adm active && sudo tuned-adm verify
Тo change the profile, use one of the three lines
$ sudo tuned-adm profile realtime-virtual-guest && sudo tuned-adm active && sudo tuned-adm verify
$ sudo tuned-adm profile virtual-guest && sudo tuned-adm active && sudo tuned-adm verify
$ sudo tuned-adm profile default && sudo tuned-adm active && sudo tuned-adm verify
To permanently disable tuned and revert all changes it performed, run:
$ sudo service tuned stop && sudo tuned-adm off && sudo systemctl disable tuned && sudo killall tuned && sudo powerprofilesctl set balanced && sudo powerprofilesctl list
For Ubuntu 23.04, 23.10
- Run the following commands
$ virt-manager
$ htop -t -F libvirtd
The result should look something like:
  [Main] [I/O]
    PID△USER       PRI  NI  VIRT   RES   SHR S  CPU% MEM%   TIME+  Command
    976 root        20   0 1602M 36044 22348 S   0.0  0.2  0:01.32 ├─ /usr/sbin/libvirtd --timeout 120
    .
    .
    999 root        20   0 1602M 36044 22348 S   0.0  0.2  0:00.00 │  ├─ /usr/sbin/libvirtd --timeout 120
   1001 root        20   0 1602M 36044 22348 S   0.0  0.2  0:00.00 │  └─ /usr/sbin/libvirtd --timeout 120
   5905 username    20   0  140M  132M  3584 R  50.0  0.0  0:00.10 │  │     └─ htop -t -F libvird
- Run the following commands with the lowest PID value for libvirtd
$ sudo renice -20 -g <PID>
$ sudo chrt -a -r -p 99 <PID>
- Run the following command
$ htop -t -F libvirtd
The end result should look something like:
  [Main] [I/O]
    PID△USER       PRI  NI  VIRT   RES   SHR S  CPU% MEM%   TIME+  Command
    976 root        RT -20 1602M 36044 22348 S   0.0  0.2  0:01.32 ├─ /usr/sbin/libvirtd --timeout 120
    .
    .
    999 root        RT -20 1602M 36044 22348 S   0.0  0.2  0:00.00 │  ├─ /usr/sbin/libvirtd --timeout 120
   1001 root        RT -20 1602M 36044 22348 S   0.0  0.2  0:00.00 │  └─ /usr/sbin/libvirtd --timeout 120
   5905 username    20   0  140M  132M  3584 R  50.0  0.0  0:00.10 │  │     └─ htop -t -F libvird
For Ubuntu 22.04 LTS, 22.10
Note: Perhaps after Ubuntu 22.04 LTS, 22.10 update the process will become similar to the process for Ubuntu 23.04 or 23.10.
$ htop -t
The result should look something like:
  [Main] [I/O]
    PID▽USER       PRI  NI  VIRT   RES   SHR S  CPU% MEM%   TIME+  Command
      2 root        20   0     0     0     0 S   0.0  0.0  0:00.00 kthreadd
  10011 root        20   0     0     0     0 S   0.0  0.0  0:01.17 ├─ 9998
  10005 root        20   0     0     0     0 S   0.0  0.0  0:00.11 ├─ kvm-nx-lpage-recovery-9998
  10004 root         0 -20     0     0     0 I   0.0  0.0  0:00.00 └─ kvm
      1 root        20   0  166M 13300  7344 S   0.0  0.1  0:04.02 init
   9998 libvirt-qe  20   0 11.1G 8371M 11796 S  93.0 52.7  2h35:34 ├─ qemu-system-x86_64 -name guest=username,debug-threads=on -S -object {"qom-type":"secret","
  18086 libvirt-qe  20   0 11.1G 8371M 11796 S   0.0 52.7  0:00.00 │  ├─ worker
  10012 libvirt-qe  20   0 11.1G 8371M 11796 S   0.0 52.7  0:20.20 │  ├─ SPICE Worker
  10010 libvirt-qe  20   0 11.1G 8371M 11796 S   9.3 52.7 18:42.97 │  ├─ CPU 3/KVM
  10009 libvirt-qe  20   0 11.1G 8371M 11796 S  27.9 52.7 18:31.20 │  ├─ CPU 2/KVM
  10008 libvirt-qe  20   0 11.1G 8371M 11796 R  18.6 52.7 25:01.04 │  ├─ CPU 1/KVM
  10007 libvirt-qe  20   0 11.1G 8371M 11796 R   9.3 52.7  1h08:06 │  ├─ CPU 0/KVM
  10006 libvirt-qe  20   0 11.1G 8371M 11796 S   0.0 52.7  0:25.50 │  ├─ IO mon_iothread
  10002 libvirt-qe  20   0 11.1G 8371M 11796 S   0.0 52.7  0:00.11 │  └─ qemu-system-x86_64 -name guest=username,debug-threads=on -S -object {"qom-type":"secret
   9990 root        20   0 80140 13292 11496 S   0.0  0.1  0:00.00 ├─ virtlogd
   1644 username    20   0 19456 10288  7352 S   0.0  0.1  0:00.58 ├─ systemd --user
   9903 username    20   0  937M 89440 39952 S   0.0  0.5  0:40.61 │  └─ python3 /usr/bin/virt-manager
   9908 username    20   0  937M 89440 39952 S   0.0  0.5  0:07.74 │     ├─ virt-manager
   9907 username    20   0  937M 89440 39952 S   0.0  0.5  0:00.00 │     ├─ dconf worker
   9906 username    20   0  937M 89440 39952 S   0.0  0.5  0:00.00 │     ├─ gdbus
   9904 username    20   0  937M 89440 39952 S   0.0  0.5  0:00.00 │     └─ gmain
    960 root        20   0 1526M 34408 19836 S   0.0  0.2  0:22.20 └─ libvirtd
  10001 root        20   0 1526M 34408 19836 S   0.0  0.2  0:08.64    ├─ vm-username
   1014 root        20   0 1526M 34408 19836 S   0.0  0.2  0:00.06    ├─ udev-event
    990 root        20   0 1526M 34408 19836 S   0.0  0.2  0:00.00    ├─ gdbus
    989 root        20   0 1526M 34408 19836 S   0.0  0.2  0:00.00    ├─ gmain
    986 root        20   0 1526M 34408 19836 S   0.0  0.2  0:00.00    ├─ rpc-admin
    985 root        20   0 1526M 34408 19836 S   0.0  0.2  0:00.00    ├─ rpc-admin
    984 root        20   0 1526M 34408 19836 S   0.0  0.2  0:00.00    ├─ rpc-admin
    983 root        20   0 1526M 34408 19836 S   0.0  0.2  0:00.00    ├─ rpc-admin
    982 root        20   0 1526M 34408 19836 S   0.0  0.2  0:00.00    ├─ rpc-admin
    975 root        20   0 1526M 34408 19836 S   0.0  0.2  0:00.22    ├─ prio-rpc-libvir
    974 root        20   0 1526M 34408 19836 S   0.0  0.2  0:00.22    ├─ prio-rpc-libvir
    973 root        20   0 1526M 34408 19836 S   0.0  0.2  0:00.23    ├─ prio-rpc-libvir
    972 root        20   0 1526M 34408 19836 S   0.0  0.2  0:00.21    ├─ prio-rpc-libvir
    971 root        20   0 1526M 34408 19836 S   0.0  0.2  0:00.23    ├─ prio-rpc-libvir
    970 root        20   0 1526M 34408 19836 S   0.0  0.2  0:02.15    ├─ rpc-libvirtd
    969 root        20   0 1526M 34408 19836 S   0.0  0.2  0:02.11    ├─ rpc-libvirtd
    968 root        20   0 1526M 34408 19836 S   0.0  0.2  0:02.19    ├─ rpc-libvirtd
    967 root        20   0 1526M 34408 19836 S   0.0  0.2  0:02.09    ├─ rpc-libvirtd
    966 root        20   0 1526M 34408 19836 S   0.0  0.2  0:02.04    └─ rpc-libvirtd
- Set NI (nice) value -5 for all root processes (You will need this every time you start or reboot your operating system)
$ sudo renice -5 -u root
- Set NI (nice) value -20 for qemu-system-x86_64 (9998), virt-manager,
libvirtd, kvm-nx-lpage-recovery-****, kvm, virtlogd commands (You
will need this every time you start your guest machine)
display all the running threads for commands qemu-system-x86_64 (9998), virt-manager, libvirtd
example: $ sudo ps -Ljf <PID>
$ ps -Ljf 9998 9903 960
for commands qemu-system-x86_64 (9998), virt-manager, libvirtd run:
example: $ sudo renice -20 -g <PGID>
$ sudo renice -20 -g 9997 9903 960
for commands kvm-nx-lpage-recovery-9998, kvm, virtlogd run:
example: $ sudo renice -20 <PID>
$ sudo renice -20 10005 10004 9990
- Set the commands kvm-nx-lpage-recovery-9998, kvm, qemu-system-x86_64
(9998), virtlogd, virt-manager, libvirtd to real-time (You will need
this every time you start your guest machine)
$ sudo chrt -a -r -p 99 10005
$ sudo chrt -a -r -p 99 10004
$ sudo chrt -a -r -p 99 9998
$ sudo chrt -a -r -p 99 9990
$ sudo chrt -a -r -p 99 9903
$ sudo chrt -a -r -p 99 960
$ htop -t
The end result should look something like:
  [Main] [I/O]
    PID▽USER       PRI  NI  VIRT   RES   SHR S  CPU% MEM%   TIME+  Command
      2 root        20  -5     0     0     0 S   0.0  0.0  0:00.00 kthreadd
  10011 root        RT -20     0     0     0 S   0.0  0.0  0:01.17 ├─ 9998
  10005 root        RT -20     0     0     0 S   0.0  0.0  0:00.11 ├─ kvm-nx-lpage-recovery-9998
  10004 root        RT -20     0     0     0 I   0.0  0.0  0:00.00 └─ kvm
      1 root        20  -5  166M 13300  7344 S   0.0  0.1  0:04.02 init
   9998 libvirt-qe  RT -20 11.1G 8371M 11796 S  93.0 52.7  2h35:34 ├─ qemu-system-x86_64 -name guest=username,debug-threads=on -S -object {"qom-type":"secret","
  18086 libvirt-qe  RT -20 11.1G 8371M 11796 S   0.0 52.7  0:00.00 │  ├─ worker
  10012 libvirt-qe  RT -20 11.1G 8371M 11796 S   0.0 52.7  0:20.20 │  ├─ SPICE Worker
  10010 libvirt-qe  RT -20 11.1G 8371M 11796 S   9.3 52.7 18:42.97 │  ├─ CPU 3/KVM
  10009 libvirt-qe  RT -20 11.1G 8371M 11796 S  27.9 52.7 18:31.20 │  ├─ CPU 2/KVM
  10008 libvirt-qe  RT -20 11.1G 8371M 11796 R  18.6 52.7 25:01.04 │  ├─ CPU 1/KVM
  10007 libvirt-qe  RT -20 11.1G 8371M 11796 R   9.3 52.7  1h08:06 │  ├─ CPU 0/KVM
  10006 libvirt-qe  RT -20 11.1G 8371M 11796 S   0.0 52.7  0:25.50 │  ├─ IO mon_iothread
  10002 libvirt-qe  RT -20 11.1G 8371M 11796 S   0.0 52.7  0:00.11 │  └─ qemu-system-x86_64 -name guest=username,debug-threads=on -S -object {"qom-type":"secret
   9990 root        RT -20 80140 13292 11496 S   0.0  0.1  0:00.00 ├─ virtlogd
   1644 username    20   0 19456 10288  7352 S   0.0  0.1  0:00.58 ├─ systemd --user
   9903 username    RT -20  937M 89440 39952 S   0.0  0.5  0:40.61 │  └─ python3 /usr/bin/virt-manager
   9908 username    RT -20  937M 89440 39952 S   0.0  0.5  0:07.74 │     ├─ virt-manager
   9907 username    RT -20  937M 89440 39952 S   0.0  0.5  0:00.00 │     ├─ dconf worker
   9906 username    RT -20  937M 89440 39952 S   0.0  0.5  0:00.00 │     ├─ gdbus
   9904 username    RT -20  937M 89440 39952 S   0.0  0.5  0:00.00 │     └─ gmain
    960 root        RT -20 1526M 34408 19836 S   0.0  0.2  0:22.20 └─ libvirtd
  10001 root        RT -20 1526M 34408 19836 S   0.0  0.2  0:08.64    ├─ vm-username
   1014 root        RT -20 1526M 34408 19836 S   0.0  0.2  0:00.06    ├─ udev-event
    990 root        RT -20 1526M 34408 19836 S   0.0  0.2  0:00.00    ├─ gdbus
    989 root        RT -20 1526M 34408 19836 S   0.0  0.2  0:00.00    ├─ gmain
    986 root        RT -20 1526M 34408 19836 S   0.0  0.2  0:00.00    ├─ rpc-admin
    985 root        RT -20 1526M 34408 19836 S   0.0  0.2  0:00.00    ├─ rpc-admin
    984 root        RT -20 1526M 34408 19836 S   0.0  0.2  0:00.00    ├─ rpc-admin
    983 root        RT -20 1526M 34408 19836 S   0.0  0.2  0:00.00    ├─ rpc-admin
    982 root        RT -20 1526M 34408 19836 S   0.0  0.2  0:00.00    ├─ rpc-admin
    975 root        RT -20 1526M 34408 19836 S   0.0  0.2  0:00.22    ├─ prio-rpc-libvir
    974 root        RT -20 1526M 34408 19836 S   0.0  0.2  0:00.22    ├─ prio-rpc-libvir
    973 root        RT -20 1526M 34408 19836 S   0.0  0.2  0:00.23    ├─ prio-rpc-libvir
    972 root        RT -20 1526M 34408 19836 S   0.0  0.2  0:00.21    ├─ prio-rpc-libvir
    971 root        RT -20 1526M 34408 19836 S   0.0  0.2  0:00.23    ├─ prio-rpc-libvir
    970 root        RT -20 1526M 34408 19836 S   0.0  0.2  0:02.15    ├─ rpc-libvirtd
    969 root        RT -20 1526M 34408 19836 S   0.0  0.2  0:02.11    ├─ rpc-libvirtd
    968 root        RT -20 1526M 34408 19836 S   0.0  0.2  0:02.19    ├─ rpc-libvirtd
    967 root        RT -20 1526M 34408 19836 S   0.0  0.2  0:02.09    ├─ rpc-libvirtd
    966 root        RT -20 1526M 34408 19836 S   0.0  0.2  0:02.04    └─ rpc-libvirtd
Use 'q' to stop
- If the issue is not completely resolved try to use fewer CPU cores.
Referring to physical CPU topology set the number of cores to half.
For example, the Intel® Core™ i5-6600 Processor has 4 cores. To use
half number of cores set CPU topology to 1 sockets, 2 cores,
1 threads.
- Increase the buffer size for your audio interface's ASIO driver.
Problem: My guest machine shuts down suddenly.
Action:
- To display and monitor hardware temperature, install the following
packages
$ sudo apt install lm-sensors glances psensor
Note: Run sudo sensors-detect before running sensors.
- If the CPU is overheating, check whether overclocking mode is enabled
in the BIOS. If yes, turn it off. To learn about the high and
critical temperature of the CPU, refer to its datasheet.
Note: You can also find out about high and critical CPU temperature using "sensors" tool.
- Try to set the profile to "Balanced" or "Power Saver"
Note: If the problem persists, contact a technician for advanced system diagnostics. It may be necessary to replace the thermal paste or the CPU cooling system.
Problem: Heavy load on the CPU when accessing the qcow2 disk image (Virtual Disk). Intermittent sound with crackling on virtual machine using sample libraries.
Action:
- set virtual disk cache mode to unsafe
- passthrough an additional physical SSD M.2 or passthrough an additional SATA 3.0 PCIe Gen3 x1 card for SATA SSD/HDD.
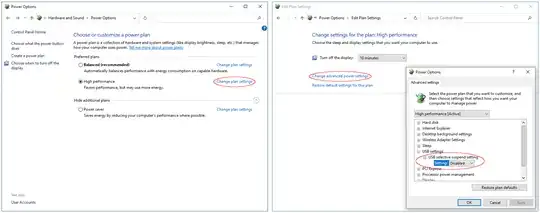
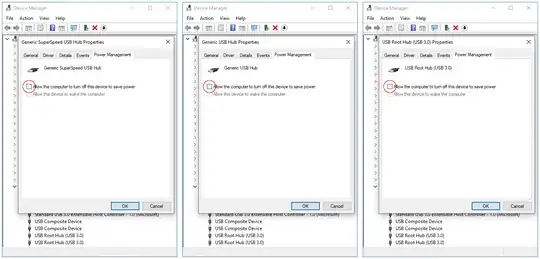
Problem: USB devices (HDD/SSD, Webcam, Midi keyboard) stop responding after a few minutes inactivity on a Windows 10 system.
Action:
- disable USB Selective Suspending via Power Options
- prevent the Windows 10 OS to turn off Generic SuperSpeed USB Hub,
Generic USB Hub, USB Root Hub devices to save power via Device
Manager.
REFERENCES


